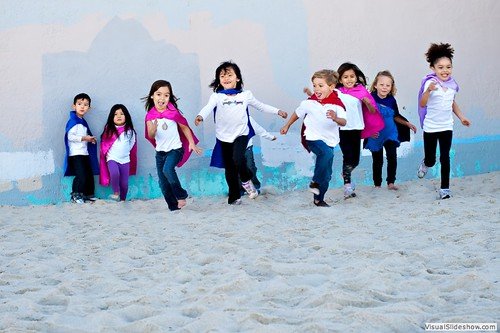
Climate Superhero Capes

Who wouldn’t want a Climate Superhero Cape?
It’s a great kids’ project for summer sun or a rainy day. Climate-related stencils, decorating capes, and perhaps having a Climate Superhero parade.
Making the Capes
- Old T-shirts, pillowcases, or fabric scraps Fabric scissors
- Fabric markers or non-toxic paint
- Large clips or Velcro (optional for closures)
Steps:
- Cut the back panel of a large T-shirt to make a cape shape. You can also use a rectangular scrap of fabric.
- Create stencils for climate symbols: trees, bees, solar panels, animals.
- Let kids decorate their capes with drawings or messages like “Planet Protector” or “Green Hero.”
- Attach Velcro, or use clothes pegs or chip bag clips, if you want them to wear it hands-free.
- Have a superhero parade—or act out “missions” to save the Earth.
Facts and pictures to start you off. Click below.
How to Make Stencils Together
Here’s a friendly, non-technical, parent-and-child–friendly guide to making stencils. It’s simple enough for a rainy afternoon but leaves room for creativity (and a little mess).
If you’ve ever wanted to decorate a tote bag, paint bees on a birdhouse, or add fun shapes to your bedroom wall, stencils are the magic trick. They’re easy to make, reusable, and a great project for parents and kids to do side-by-side. No fancy tools needed—just some imagination and a few basics.
1: Pick Your Design
First, decide what you want to stencil.
If you’re stuck for ideas, think about:
Nature: trees, leaves, bees, birds, sun, waves Climate symbols: solar panels, wind turbines, recycling arrows Fun extras: stars, hearts, spirals, lightning bolts
Tip: Keep it simple—shapes with fewer details are easier to cut out.
2: Supplies
Choose Your Stencil Material
You can make stencils from lots of things you already have:
- Cardstock or cereal boxes – easy to cut, great for one-time use
- Plastic from old binders or report covers – reusable and easy to wipe clean Stencil sheets – sold at craft stores if you want something sturdy
3: Draw or Trace Your Shape
- Place your stencil material on a flat table. Use a pencil to lightly sketch your design. Or print a picture, cut it out, and trace around it. Make sure the lines are smooth—this will make cutting much easier.
4: Cut It Out
- For safety: Kids: Use blunt-tip craft scissors. Parents: Use a craft knife for small details (always cut on a cutting mat or thick cardboard).
- Cut inside the lines so that your stencil shape stays true. The empty space is where the paint will go.
5: Get Ready to Paint
Before you start:
- Tape your stencil to the surface so it doesn’t move. Use a stencil brush or a sponge. Dip it in paint, then dab off most of the paint onto a paper towel. (Too much paint makes smudges—less is more!)
6: Paint and Peel
Dab or swirl paint into the open areas. Carefully lift the stencil straight up—ta-da! Your design appears. If using plastic stencils, wipe them clean so you can reuse them.
Fun Twist: Layer Your Stencils
Try stencilling one shape on top of another, like a yellow sun with a bee flying in front of it.
Extra Tips for Parent-Child Success
- Keep stencils small for younger kids—about the size of your hand.
- Use washable paint to make clean-up stress-free.
- Let kids be the “design boss” for one stencil—they’ll love seeing their idea come to life.
- Store stencils in a folder for future projects.
Making stencils isn’t just about the art—it’s about creating together. Every cut, dab, and painted bee is a memory you’ve made.
